Asphalt Shingle Roofing Contractors Your Guide
Asphalt shingle roofing contractors are key players in ensuring a durable and aesthetically pleasing roof. Choosing the right contractor can mean the difference between a long-lasting, beautiful roof and costly repairs down the line. This guide walks you through everything you need to know, from understanding asphalt shingles themselves to finding and working with reputable contractors, budgeting, and understanding warranties. We’ll cover selecting the right shingles for your home, navigating the project process, and ensuring you get the best value for your investment.
We’ll delve into the specifics of different shingle types, their lifespans, and maintenance needs. Also show you how to compare contractor quotes effectively, vet potential contractors thoroughly, and understand the various stages of a roofing project. Finally, we’ll help you create a realistic budget and understand the importance of warranties and guarantees.
Understanding Asphalt Shingle Roofing
Asphalt shingles are the most common roofing material in North America, offering a balance of affordability, durability, and aesthetic appeal. Understanding the different types, lifespans, and maintenance needs is crucial for homeowners and contractors alike. This section will provide a comprehensive overview of asphalt shingle roofing, comparing it to other materials and examining various brands.
Asphalt Shingle Types
Asphalt shingles come in a variety of styles and compositions, each offering different performance characteristics and price points. The most common types include 3-tab shingles, architectural shingles, and luxury shingles. 3-tab shingles are the most basic and economical option, known for their simple, flat design. Architectural shingles, also known as dimensional shingles, offer a more textured and visually appealing look due to their layered design, providing greater durability and wind resistance. Luxury shingles represent the top tier, often incorporating enhanced features like thicker construction, higher-quality materials, and advanced weather protection. The choice depends on budget and desired aesthetic and performance levels.
Asphalt Shingle Lifespan and Maintenance
The lifespan of asphalt shingles varies considerably depending on the type, quality, and climate. 3-tab shingles typically last 15-20 years, while architectural shingles can last 25-30 years or more. Luxury shingles, with their superior construction, can extend that lifespan even further, sometimes exceeding 40 years. Proper maintenance is key to maximizing the lifespan of any asphalt shingle roof. This includes regular cleaning to remove debris and moss, prompt repair of any damaged shingles, and periodic inspections to identify potential problems early on. Neglecting maintenance can significantly shorten the lifespan and lead to costly repairs down the line. For example, a neglected roof in a region with heavy snowfall might suffer premature damage due to ice dams, reducing its effective lifespan by several years.
Advantages and Disadvantages of Asphalt Shingle Roofing
Asphalt shingles offer several advantages, including relatively low cost, ease of installation, wide availability, and a variety of colors and styles. They are also relatively lightweight, making them suitable for many different types of roofs. However, asphalt shingles also have disadvantages. They have a shorter lifespan compared to some other roofing materials like tile or slate, and they are susceptible to damage from strong winds, hail, and fire. Their aesthetic appeal can be considered less sophisticated than other materials by some homeowners, although advancements in design and color options are continually bridging this gap. The overall value proposition often comes down to a balance between cost and longevity, weighed against aesthetic preferences.
Comparison of Common Asphalt Shingle Brands
Choosing the right asphalt shingle brand is crucial for ensuring the longevity and performance of your roof. The following table compares some of the leading brands, highlighting their key features and approximate price ranges (prices can vary significantly based on location and supplier).
| Brand | Key Features | Warranty | Approximate Price Range (per square) |
|---|---|---|---|
| Owens Corning | Variety of styles, high wind resistance, good warranty | Variable, depending on shingle type | $80-$150 |
| CertainTeed | Wide selection, durable, various warranty options | Variable, depending on shingle type | $75-$140 |
| GAF | Innovative designs, strong warranties, diverse color options | Variable, depending on shingle type | $85-$160 |
| IKO | Reliable performance, good value, various styles | Variable, depending on shingle type | $70-$130 |
Finding and Vetting Contractors
Choosing the right contractor is crucial for a successful roofing project. A poorly chosen contractor can lead to shoddy workmanship, cost overruns, and significant headaches. Taking the time to thoroughly vet potential contractors will save you time, money, and stress in the long run. This section will guide you through the process of finding and evaluating qualified asphalt shingle roofing contractors.
Contractor Qualification Questions
Asking the right questions during the initial consultation is key to assessing a contractor’s suitability. These questions should help you gauge their experience, professionalism, and understanding of your needs. Don’t hesitate to ask follow-up questions to clarify any uncertainties.
- The contractor’s years of experience in asphalt shingle roofing installation and repair.
- The number of similar projects they’ve completed, with examples of their work (preferably local projects).
- Their process for handling permits and inspections, including providing documentation if requested.
- Their warranty offerings and the specifics of their coverage, including material and labor.
- Their approach to project management, including communication frequency and timelines.
- Details about their cleanup procedures after the completion of the work.
- Their payment schedule and what payment methods they accept.
- Their approach to addressing unexpected issues that might arise during the project.
- References from previous clients, with contact information to verify their experiences.
- Whether they are properly insured and licensed to operate in your area.
Verifying Licenses and Insurance
Confirming a contractor’s licensing and insurance is a non-negotiable step. Unlicensed contractors may lack the necessary skills and training, and uninsured contractors leave you vulnerable to financial liability if accidents occur on your property.
Contact your state’s licensing board to verify the contractor’s license status and check for any disciplinary actions. You should also ask the contractor for proof of their general liability and workers’ compensation insurance. These policies protect you from financial losses resulting from accidents or damage caused by the contractor’s work or employees.
Checking Online Reviews and Testimonials
Online reviews and testimonials offer valuable insights into a contractor’s reputation and past performance. They provide a glimpse into the experiences of previous clients, highlighting both positive and negative aspects of their work.
Check reputable review websites such as Yelp, Google Reviews, Angie’s List, and the Better Business Bureau. Look for patterns in the reviews. Consistent positive feedback suggests a reliable contractor, while numerous negative reviews should raise red flags. Pay close attention to reviews that detail specific aspects of the contractor’s work, such as professionalism, communication, and quality of work.
Comparing Contractor Quotes
Receiving multiple quotes is essential for making an informed decision. However, don’t solely focus on price. Consider the following factors when comparing quotes:
Creating a comparison table is helpful. List each contractor, their price, materials used, warranty details, payment schedule, and any other relevant information. This allows for a side-by-side comparison, making the decision-making process more efficient and objective.
| Contractor | Price | Materials | Warranty | Payment Schedule | Other Notes |
|---|---|---|---|---|---|
| Contractor A | $10,000 | CertainTeed Landmark | 25 years | 3 payments | Excellent communication |
| Contractor B | $9,500 | GAF Timberline | 20 years | 1 payment | Mixed reviews online |
| Contractor C | $11,000 | Owens Corning Duration | 30 years | 2 payments | High ratings, but expensive |
Remember, the cheapest option isn’t always the best. Consider the overall value offered by each contractor, including the quality of materials, warranty coverage, and the contractor’s reputation. A slightly higher price may be justified by superior workmanship and long-term value.
The Roofing Project Process
Getting a new asphalt shingle roof is a significant undertaking, but understanding the process can make it less daunting. This section breaks down the typical stages, necessary permits, potential problems, and a sample timeline to help you prepare.
A typical asphalt shingle roofing project involves several distinct phases, each with its own set of tasks and considerations. Successful completion relies on careful planning and communication between you, the contractor, and any relevant authorities.
Project Stages
The roofing project unfolds in a series of sequential steps. While minor variations can occur depending on the specifics of your project, this general article covers the core components.
- Initial Assessment and Consultation: The contractor visits your property, assesses the existing roof, discusses your needs and preferences (e.g., shingle color, style), and provides a detailed estimate.
- Permitting and Inspections: Necessary permits are secured from your local building department. This often involves submitting plans and specifications. Inspections are scheduled at various stages of the project to ensure compliance with building codes.
- Material Procurement: The contractor orders the necessary roofing materials, including shingles, underlayment, flashing, and fasteners. Lead times for materials can vary, so it’s important to factor this into the overall timeline.
- Roof Tear-off (if necessary): If you’re replacing an existing roof, the old shingles and underlayment will be removed. Debris is carefully managed and disposed of properly.
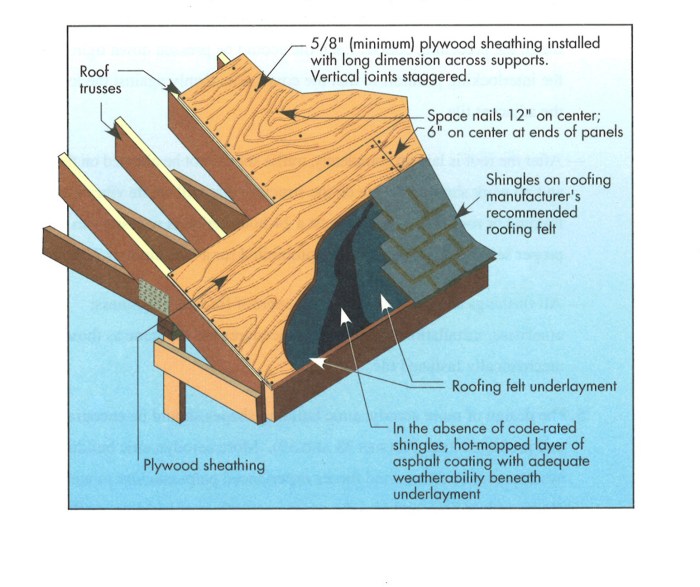
- Roof Deck Inspection and Repair: The existing roof deck is inspected for damage. Any necessary repairs, such as replacing rotted plywood, are completed before new roofing materials are installed.
- Underlayment Installation: A waterproof underlayment is installed over the roof deck to provide an additional layer of protection against moisture.
- Shingle Installation: The asphalt shingles are installed according to manufacturer’s specifications and industry best practices. This is a crucial stage requiring skilled labor.
- Flashing Installation: Flashing is installed around chimneys, vents, and other penetrations in the roof to prevent water leakage.
- Final Inspection: A final inspection is conducted by the building department to ensure that the completed roof meets all code requirements.
- Cleanup: The contractor removes all debris from the property, leaving the area clean and tidy.
Permits and Inspections
Obtaining the necessary permits and undergoing inspections is a critical aspect of any roofing project. These steps ensure the work is done safely and according to code, protecting both you and the contractor.
The specific permits required vary by location. Typically, a building permit is needed for any major roof work. Inspections may be required at various stages, such as after the tear-off, before shingle installation, and after completion. Failure to obtain necessary permits or pass inspections can lead to delays and potential fines.
Common Challenges and Potential Problems
While most asphalt shingle roofing projects go smoothly, certain challenges can arise. Being aware of these potential issues can help you prepare and mitigate risks.
- Unexpected Roof Deck Damage: During tear-off, previously unseen damage to the roof deck may be discovered, requiring additional repairs and potentially extending the project timeline.
- Weather Delays: Rain, snow, or high winds can significantly delay the project. Contractors often have contingency plans, but severe weather can cause unpredictable setbacks.
- Material Shortages: Supply chain issues can occasionally lead to delays in obtaining necessary roofing materials.
- Substandard Workmanship: Hiring an inexperienced or unqualified contractor can result in poor workmanship, leading to leaks, premature shingle failure, and costly repairs down the line.
Sample Project Timeline
This timeline provides a general estimate. Actual durations may vary based on project size, complexity, weather conditions, and other factors. Always discuss a detailed timeline with your chosen contractor.
| Project Stage | Estimated Duration |
|---|---|
| Initial Assessment & Consultation | 1-2 days |
| Permitting & Inspections | 5-10 days |
| Material Procurement | 1-2 weeks |
| Roof Tear-off | 1-2 days |
| Roof Deck Inspection & Repair | 1-3 days |
| Underlayment Installation | 1-2 days |
| Shingle Installation | 3-5 days |
| Flashing Installation | 1-2 days |
| Final Inspection | 2-5 days |
| Cleanup | 1 day |
Cost and Budgeting

Source: westfraser.com
Planning your asphalt shingle roofing project requires careful consideration of costs. The total expense depends on several factors, including the roof’s size, the type of shingles chosen, labor rates in your area, and any unforeseen complications. Understanding these cost components will help you create a realistic budget and avoid unpleasant surprises.
Asphalt Shingle Roofing Cost Breakdown Examples
Let’s look at some hypothetical examples to illustrate how costs can vary. Assume a standard-sized house with a 2,000 square foot roof.
Example 1: Basic 3-tab asphalt shingles. Material costs might range from $2,000 to $4,000, labor costs from $4,000 to $6,000, and permits around $500. The total could be between $6,500 and $10,500.
Example 2: Higher-end architectural shingles with more complex installation. Materials could cost $5,000 to $8,000, labor $6,000 to $9,000, and permits remaining around $500. The total in this case might be $11,500 to $17,500.
Example 3: A smaller 1,000 square foot roof with basic 3-tab shingles. Material costs might be $1,000 to $2,000, labor $2,000 to $3,000, and permits $500. The total could range from $3,500 to $5,500. These are estimates, and actual costs can fluctuate based on specific circumstances.
Financing Options for Roofing Projects
Several financing options can make a new roof more manageable. Home equity loans or lines of credit (HELOCs) allow you to borrow against your home’s equity. Personal loans from banks or credit unions offer another route, though interest rates can vary. Some roofing contractors may offer financing plans or work with specific lenders, simplifying the process. It’s essential to compare interest rates and terms from multiple sources before committing.
Creating a Realistic Roofing Budget
Start by getting multiple estimates from reputable contractors. These estimates should detail material costs, labor charges, and permit fees separately. Factor in potential unexpected expenses – perhaps discovering underlying damage requiring additional repairs. Add a contingency buffer of 10-20% to your total estimated cost to account for these unknowns. Explore financing options to determine the most suitable repayment plan for your financial situation.
Average Cost Ranges for Roofing Projects
| Project Aspect | Low Estimate | High Estimate | Notes |
|---|---|---|---|
| Materials (Asphalt Shingles) | $1,000 | $10,000+ | Varies greatly based on shingle type and roof size |
| Labor | $2,000 | $10,000+ | Depends on roof complexity and labor rates in your region |
| Permits | $200 | $1,000 | Local permit fees vary significantly |
| Total Estimated Cost | $3,200 | $21,000+ | This is a broad range; get multiple estimates for your specific project. |
Warranty and Guarantees

Source: roofmaxx.com
Understanding warranties is crucial when investing in a new roof. Both the shingle manufacturer and your roofing contractor offer warranties, but they cover different aspects of the project and have different terms. Knowing the specifics protects your investment and avoids potential disputes down the line.
Understanding the nuances of these warranties can feel overwhelming, but it’s essential for making informed decisions. This section will break down the typical components of roofing warranties, highlighting key differences and potential pitfalls.
Manufacturer’s Shingle Warranty
The manufacturer’s warranty covers defects in the shingles themselves. This typically includes issues like manufacturing flaws, granule loss that compromises the shingle’s integrity, or premature cracking. The warranty period varies depending on the shingle type and manufacturer, ranging from 20 to 50 years. However, it’s important to note that these warranties usually only cover the cost of the shingles themselves, not the labor to replace them. For example, a 30-year warranty might cover the replacement of defective shingles within those 30 years, but you’d likely be responsible for the cost of labor to remove the old and install the new shingles. Reading the fine print carefully is vital to understand the extent of the manufacturer’s responsibility.
Contractor’s Warranty, Asphalt shingle roofing contractors
The contractor’s warranty covers the workmanship of the roofing installation. This typically includes issues arising from improper installation, such as leaks caused by faulty flashing or inadequate underlayment. Contractor warranties usually last for a shorter period, often 1 to 2 years, but sometimes longer depending on the contractor and the specific contract. This warranty covers the labor costs associated with correcting these issues, as well as any material costs if the contractor is responsible for the faulty material used during the installation. A comprehensive contractor warranty should clearly define the scope of work covered and any exclusions.
Types of Roofing Warranties
There isn’t a standardized naming convention for roofing warranties. However, we can categorize them based on their coverage:
The key differences lie in the duration of coverage and what specific issues are covered. Some warranties are “non-prorated,” meaning the manufacturer or contractor covers the full cost of repair or replacement regardless of how long ago the installation occurred (within the warranty period). Others are “prorated,” meaning the coverage decreases over time. For instance, a prorated warranty might cover 100% of the cost in the first year, 50% in the fifth year, and so on.
Sample Warranty Document
This is a sample and should not be considered legal advice. Always consult with a legal professional for accurate legal documentation.
Warranty for Roofing Installation
This warranty is provided by [Contractor Name], [Contractor Address], for the roofing installation completed at [Property Address] on [Date].
Warranty Period: One (1) year from the date of completion.
Coverage: This warranty covers defects in workmanship, including but not limited to leaks resulting from improper installation, damaged flashing, or inadequate underlayment. This warranty does not cover damage caused by acts of God (e.g., hurricanes, tornadoes), normal wear and tear, or neglect.
Exclusions: This warranty does not cover damage caused by acts of God (e.g., hurricanes, tornadoes, hail), improper maintenance, or modifications to the roof not performed by [Contractor Name].
Claim Procedure: To file a claim, contact [Contractor Name] at [Phone Number] or [Email Address] within [Number] days of discovering the defect.
Limitations: The contractor’s liability under this warranty is limited to the repair or replacement of defective workmanship. The contractor is not liable for consequential damages.
Governing Law: This warranty shall be governed by the laws of [State].
Contractor Signature:_________________________
Date:_________________________
Visual Aids and Examples: Asphalt Shingle Roofing Contractors

Source: com.au
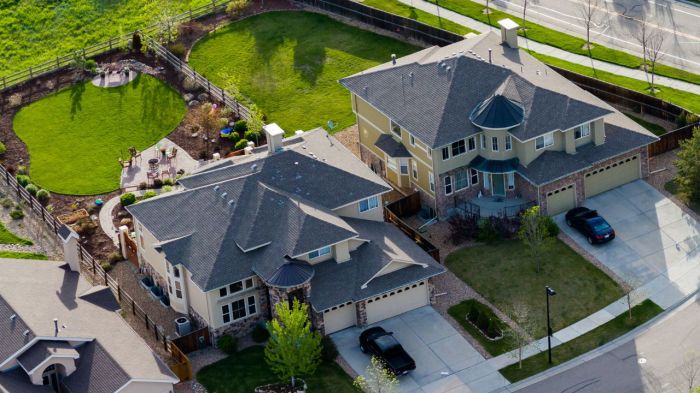
Understanding the visual aspects of asphalt shingle roofing is crucial for both homeowners and contractors. This section provides detailed descriptions of different shingle styles, installation processes, and the impact of proper and improper maintenance. Seeing the differences firsthand, even through detailed descriptions, can significantly aid in making informed decisions.
Asphalt Shingle Styles and Colors on Various House Styles
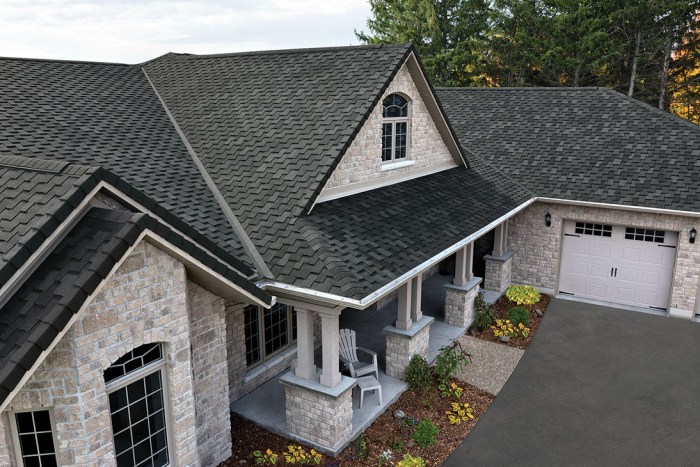
Different shingle styles and colors dramatically alter a home’s aesthetic. For instance, a three-tab shingle, characterized by its simple, flat rectangular design, offers a classic, understated look suitable for traditional homes, bungalows, or ranch-style houses. These shingles are often available in a range of muted earth tones like browns, grays, and greens, blending seamlessly with natural surroundings. In contrast, architectural shingles, with their dimensional layering and textured surfaces, create a more visually complex and upscale appearance. These shingles, often available in bolder colors and variegated blends, are well-suited for more modern or Victorian-style homes. The deep shadows and varied textures add depth and visual interest, enhancing the home’s architectural details. Consider a dark gray architectural shingle on a Craftsman-style home; the deep color accentuates the intricate woodwork and gables, providing a sophisticated contrast. Conversely, a lighter, warm brown three-tab shingle on a ranch-style home would complement its low-profile design and create a welcoming, homely feel. The choice should always reflect the architectural style and desired aesthetic of the home.
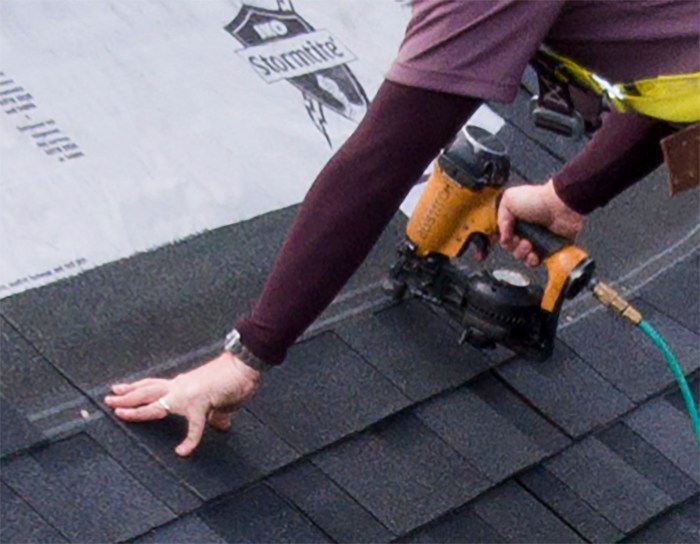
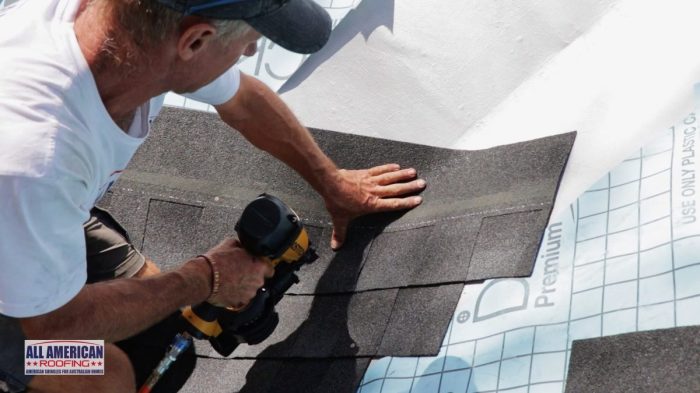
Asphalt Shingle Installation Process
Proper asphalt shingle installation is critical for a long-lasting, leak-free roof. The process begins with careful preparation, ensuring a clean, dry surface free of debris. Next, the underlayment, a waterproof membrane, is installed, providing an extra layer of protection. Then, the starter shingles are applied along the eaves, creating a straight, even base for the rest of the shingles. The main shingles are then installed, starting at the bottom and working upward. Each shingle overlaps the previous one, ensuring complete coverage. The critical aspect is achieving consistent shingle alignment and proper nailing. Shingles should be nailed securely, but not overdriven, to avoid damaging the shingle or the underlying material. Proper ventilation is crucial, as it helps prevent moisture buildup, which can lead to premature shingle degradation. Ridge caps are the final piece, carefully installed to protect the ridge from the elements. This meticulous process, when executed correctly, ensures a robust and durable roof that will protect the home for many years.
Well-Maintained vs. Neglected Asphalt Shingle Roofs
The difference between a well-maintained and a neglected asphalt shingle roof is stark. A well-maintained roof displays uniformly colored shingles, with minimal curling, cracking, or missing granules. The roofline is clean and free of debris, moss, or algae. The overall appearance is one of solidity and integrity. In contrast, a neglected roof exhibits significant wear and tear. Shingles may be curled, cracked, or missing entirely, exposing the underlayment. Granules may be heavily depleted, resulting in a faded, patchy appearance. Moss, algae, or other organic growth may be prevalent, indicating moisture accumulation and potential structural damage. Debris may accumulate in valleys and gutters, exacerbating water drainage problems. The overall impression is one of disrepair and potential vulnerability to leaks and further damage. The difference is not just aesthetic; it’s a significant indicator of the roof’s structural integrity and lifespan.
Closing Notes
Getting a new roof or repairing your existing one is a significant investment. By carefully considering the information in this guide, you can confidently navigate the process of finding a qualified asphalt shingle roofing contractor, ensuring a successful project that protects your home for years to come. Remember to ask questions, compare quotes thoroughly, and always verify credentials. With the right preparation and a little research, you can have peace of mind knowing your roof is in capable hands.