Laying Asphalt Shingles A DIY Guide
Laying asphalt shingles might seem daunting, but with the right knowledge and tools, it’s a manageable DIY project. This guide breaks down the process step-by-step, from choosing the right shingles and preparing your roof to mastering the installation techniques and ensuring a long-lasting, weatherproof roof. We’ll cover everything from essential tools and safety precautions to tackling common challenges and addressing potential problems. Get ready to become your roofing expert!
This guide covers various asphalt shingle types, essential tools, roof deck preparation, ventilation best practices, starter course installation, cutting and fitting around obstacles, creating proper overhangs and flashing, and nail placement recommendations. We’ll also discuss troubleshooting common problems like uneven surfaces and wind damage, highlighting preventative measures and repair techniques. Safety, building codes, and waste disposal are also key aspects we’ll explore.
Understanding Asphalt Shingle Laying
Laying asphalt shingles might seem daunting, but with the right knowledge and preparation, it’s a manageable DIY project for many homeowners. This guide will walk you through the process, from understanding shingle types to ensuring proper roof ventilation. Remember, safety is paramount – always prioritize your safety and consider professional help if you’re unsure about any aspect of the job.
Asphalt Shingle Types
Asphalt shingles come in a variety of styles and materials, each offering different levels of durability, aesthetic appeal, and cost. Choosing the right shingle depends on your budget, climate, and personal preferences. Common types include 3-tab shingles, architectural shingles (also known as dimensional shingles), and luxury shingles. 3-tab shingles are the most economical, offering a simple, flat appearance. Architectural shingles are thicker and more textured, providing a more upscale look and improved durability. Luxury shingles often incorporate enhanced features like thicker construction, enhanced weather resistance, and unique designs. Each type has its pros and cons regarding lifespan, cost, and aesthetic appeal. Consider researching specific brands and models to find the best fit for your needs.
Tools and Equipment for Asphalt Shingle Installation
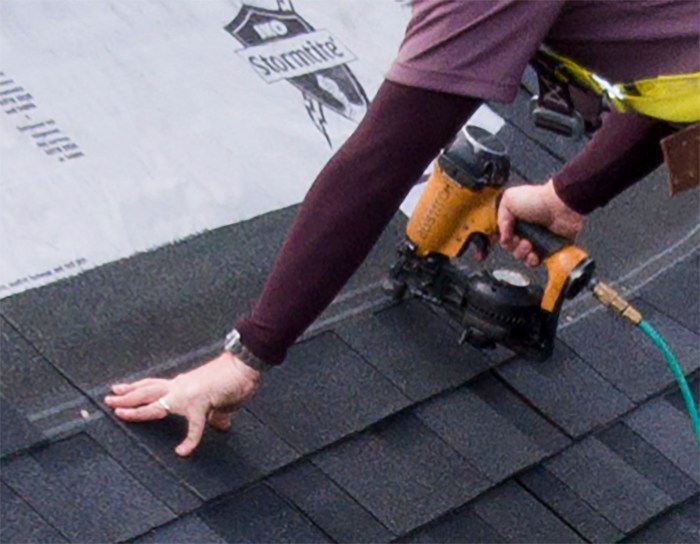
Having the right tools makes the job easier and safer. Essential tools include a roofing nail gun (or hammer and roofing nails), a utility knife, a chalk line, a measuring tape, a roofing hatchet or shovel for removing old shingles, safety glasses, work gloves, and a sturdy ladder. You’ll also need underlayment (typically felt paper), starter shingles, hip and ridge shingles (if applicable), and flashing for chimneys, vents, and other roof penetrations. Depending on the complexity of the roof, you might also consider using a roofing square to help measure and ensure consistent shingle placement. A good quality roofing nail gun significantly speeds up the installation process and reduces hand fatigue.
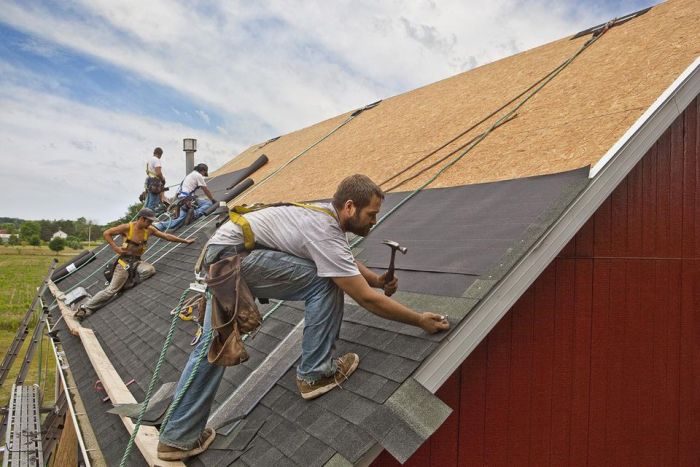
Roof Deck Preparation for Shingle Installation
Proper roof deck preparation is crucial for a long-lasting, leak-free roof. Begin by thoroughly inspecting the existing roof deck for any damaged or rotten wood. Replace any damaged sections with new, properly treated lumber. Next, ensure the roof deck is clean and free of debris, loose nails, or any other obstructions. Any loose nails should be removed and the holes filled with wood filler. This clean and even surface ensures proper adhesion of the underlayment and shingles. If necessary, you may need to use a sealant to cover any gaps or cracks to prevent leaks. A smooth, clean surface is essential for a successful installation.
Ensuring Proper Roof Ventilation
Adequate ventilation is critical to prevent moisture buildup under the shingles, which can lead to premature shingle failure and wood rot. Proper ventilation involves intake vents at the soffit (the underside of the eaves) and exhaust vents at the ridge (the highest point of the roof). The balance of intake and exhaust vents should be carefully considered based on the size and shape of your roof. Insufficient ventilation can lead to significant problems, including ice dams in colder climates and the growth of mold and mildew. Proper ventilation helps to keep the attic cool and dry, prolonging the life of your roof and improving energy efficiency. Consult local building codes for specific requirements regarding ventilation.
The Shingle Installation Process

Source: com.au
Laying asphalt shingles is a multi-step process requiring precision and attention to detail to ensure a long-lasting, weather-resistant roof. Proper installation techniques are crucial for preventing leaks and extending the lifespan of your roof. This section will guide you through the key steps involved.
Starter Course Installation
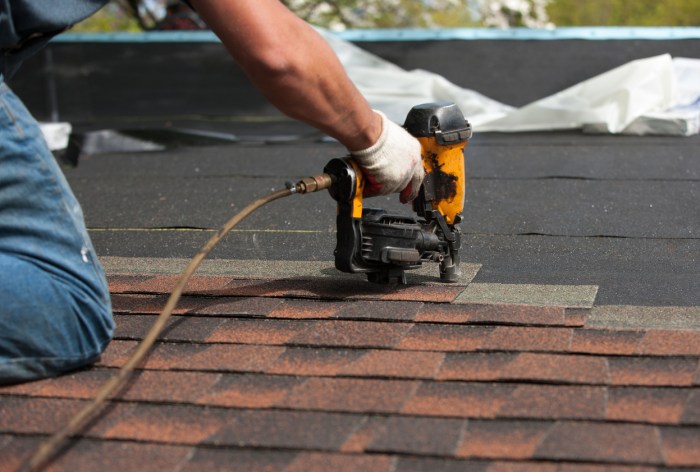
The starter course, a row of shingles laid along the eaves (the lower edge of the roof), provides a straight, even base for the rest of the shingles. Begin by aligning a row of shingles along the eaves, ensuring they are flush with the edge of the roof and overhang approximately 1 to 1 1/2 inches. Secure the starter course using roofing nails, focusing on proper spacing and penetration to avoid damaging the underlying felt. Remember to carefully cut the shingles to fit around any obstructions like valleys or chimneys. The purpose of this starter course is to create a neat and uniform foundation, facilitating the accurate alignment of subsequent shingle rows. It also helps prevent wind uplift.
Cutting and Fitting Shingles Around Obstructions
Chimneys, vents, and other roof protrusions require careful shingle placement. Measure and mark the area around the obstruction. Use a utility knife or tin snips to cut the shingles to precisely fit the shape of the obstruction, ensuring complete coverage and a watertight seal. It’s often helpful to create a template from cardboard before cutting the shingles to ensure accuracy. Remember to overlap the shingles appropriately to maintain proper weather protection. Improper cutting can leave gaps, leading to leaks.
Creating Proper Overhang and Flashing
Proper overhang and flashing are critical for preventing water damage. The shingles should overhang the edge of the roof by 1 to 1 1/2 inches to direct water away from the house’s siding. Flashing, a sheet metal covering, is installed around chimneys, vents, and other protrusions to create a waterproof barrier. Ensure the flashing is properly sealed to prevent water penetration. Properly installed flashing acts as a secondary defense against water intrusion, particularly around vulnerable areas where the roof meets other structural elements. Neglecting flashing can lead to significant water damage over time.
Recommended Nail Placement
The following table lists Articles recommended nail placement for various shingle types. Always consult the manufacturer’s instructions for specific guidelines. Proper nailing is crucial for shingle longevity and wind resistance. Under-nailing or over-nailing can both lead to premature shingle failure.
| Type | Nail Size | Number of Nails | Spacing |
|---|---|---|---|
| 3-Tab Shingles | 1-inch galvanized | 4 | 1 inch from edge, evenly spaced |
| Architectural Shingles | 1 1/4-inch galvanized | 6 | 1 inch from edge, evenly spaced across tabs |
| Laminated Shingles | 1 1/4-inch galvanized | 6-8 | 1 inch from edge, evenly spaced across tabs |
Addressing Common Challenges

Source: depositphotos.com
Asphalt shingle installation, while seemingly straightforward, presents several potential hurdles. Understanding these challenges and employing effective solutions is crucial for a long-lasting, leak-free roof. This section will cover some of the most common problems encountered and provide practical strategies for overcoming them.
Uneven Roof Surfaces
Dealing with an uneven roof surface requires careful planning and execution. Significant undulations can lead to uneven shingle lapping, gaps, and ultimately, leaks. Before starting the installation, assess the roof’s condition. Minor imperfections can often be addressed by using extra underlayment to create a more uniform base for the shingles. For more severe unevenness, consider using a thicker underlayment or even shimming the roof deck in problem areas before installing the shingles. This will create a more consistent surface for the shingles to adhere to, preventing buckling and premature wear. Remember, a well-prepared surface is the foundation of a successful shingle installation.
Wind Damage
High winds can lift and damage shingles, especially during and immediately after installation. Proper nailing is essential to prevent wind damage. Use enough nails per shingle, ensuring they are driven straight and deep enough to securely fasten the shingle to the roof deck. Consider using hurricane-rated shingles in areas prone to high winds. These shingles are designed with a stronger adhesive and a more secure locking mechanism to resist wind uplift. For existing roofs experiencing wind damage, focus on securing loose or damaged shingles, and consider replacing damaged sections completely for a uniform and durable repair. Regular roof inspections, especially after severe weather, are crucial for early detection of wind damage.
Improper Flashing
Flashing, the metal sheeting used around chimneys, vents, and other roof penetrations, is critical for preventing water intrusion. Improperly installed flashing can create gaps, allowing water to seep under the shingles and into the house. Ensure all flashing is installed correctly, overlapping seams properly and sealing any gaps with high-quality roofing cement. Pay close attention to the details of the flashing installation, as this is a common point of failure. Inspect the flashing regularly for signs of damage or deterioration, and repair or replace it as needed. Regular maintenance of the flashing will prevent costly water damage in the future.
Damaged Shingle Repair, Laying asphalt shingles
Several methods exist for repairing damaged shingles. Minor damage, like a small crack or tear, can often be repaired with roofing cement and a patch. More extensive damage may require replacing the entire shingle. For more significant damage or widespread issues, complete shingle replacement in the affected area might be the best solution. Choosing the right repair method depends on the extent of the damage and the type of shingle. It’s advisable to use shingles from the same manufacturer and batch for repairs to ensure color and material consistency.
Preventative Measures to Avoid Common Shingle Installation Mistakes
Proper planning and preparation are key to avoiding mistakes. Here’s a list of preventative measures:
- Thoroughly inspect the roof deck before starting the installation, addressing any structural issues.
- Use the correct type and amount of underlayment for the climate and roof pitch.
- Ensure proper ventilation to prevent moisture buildup.
- Use high-quality roofing nails and drive them straight and deep enough.
- Follow the manufacturer’s instructions for shingle installation carefully.
- Inspect your work regularly during and after installation to identify and correct any mistakes immediately.
- Use appropriate safety equipment, including fall protection.
Safety and Regulations: Laying Asphalt Shingles
Roofing is inherently dangerous work. Asphalt shingle installation requires careful attention to safety procedures to protect yourself and others from serious injury. Following building codes and regulations is crucial for a safe and legally compliant project.
This section includes essential safety precautions, relevant building codes, and environmental considerations for asphalt shingle installation. Understanding and adhering to these guidelines is paramount for a successful and hazard-free project.
Essential Safety Precautions
Prioritizing safety is not just a good idea; it’s a necessity. Failing to take proper safety precautions can lead to severe injuries, delays, and legal issues. The following list details some key safety measures.
- Fall Protection: Always use appropriate fall protection equipment, such as harnesses and safety lines, when working at heights. This is non-negotiable, especially on steep roofs. Regular inspections of your equipment are crucial to ensure it’s in good working order.
- Proper Attire: Wear sturdy work boots with slip-resistant soles, long pants, a long-sleeved shirt, and safety glasses to protect against falling debris and sun exposure. A hard hat is also essential for protection from falling objects.
- Roof Access and Egress: Use stable ladders and scaffolding that are appropriately sized for the job and are secured properly. Ensure that the ladder extends at least three feet above the roofline. Maintain three points of contact when climbing ladders.
- Tool Safety: Use tools correctly and maintain them in good condition. Sharp tools should be handled with extra care. Keep tools secured when not in use to prevent accidental falls.
- Weather Conditions: Never work in severe weather conditions, such as high winds, thunderstorms, or heavy rain. Postpone work until conditions are safe.
- First Aid and Emergency Procedures: Have a well-stocked first-aid kit readily available on site and know the emergency contact numbers for medical services and your supervisor.
Building Codes and Regulations
Building codes vary by location, so it’s crucial to check with your local building department to ensure compliance. These codes often specify requirements for things like underlayment, shingle type and installation methods, and ventilation. Ignoring these regulations can result in fines or even the need for costly rework.
Common regulations often cover aspects like:
- Proper ventilation: Adequate ventilation is crucial to prevent moisture buildup under the shingles, which can lead to premature shingle failure and damage to the roof structure. Codes often specify minimum ventilation requirements based on the roof area and climate.
- Flashing requirements: Flashing is crucial for waterproofing around chimneys, vents, and other roof penetrations. Codes typically specify the type and installation methods for flashing.
- Underlayment specifications: Underlayment acts as an extra layer of protection against moisture. Codes often dictate the type and installation of underlayment required.
- Wind resistance: In areas prone to high winds, building codes often require shingles that meet specific wind resistance standards.
Waste Disposal and Environmental Considerations
Proper waste disposal is essential for environmental protection and compliance with local regulations. Improper disposal can lead to environmental damage and fines.
- Shingle disposal: Many municipalities have specific regulations regarding the disposal of asphalt shingles. Some offer recycling programs, while others require disposal at designated landfills.
- Hazardous waste: Dispose of any hazardous materials, such as solvents or cleaning agents, according to local regulations. Never pour these materials down drains or onto the ground.
- Debris cleanup: Thoroughly clean up all debris, including nails, scraps of shingles, and packaging materials, from the worksite to prevent injuries and maintain a clean environment.
Potential Hazards and Mitigation
Several hazards exist during asphalt shingle installation. Understanding these hazards and implementing preventative measures is critical.
- Falls: Falls from heights are a major hazard. Mitigation involves using fall protection equipment, maintaining three points of contact on ladders, and ensuring secure footing.
- Cuts and punctures: Sharp tools and materials can cause cuts and punctures. Mitigation involves using appropriate safety gear, handling tools carefully, and wearing protective gloves.
- Exposure to the elements: Prolonged exposure to sun, heat, and cold can lead to heatstroke or hypothermia. Mitigation involves working during cooler parts of the day, staying hydrated, and wearing appropriate clothing.
- Electrocution: Contact with electrical wires can cause serious injury or death. Mitigation involves carefully checking for overhead power lines before starting work and maintaining a safe distance.
Visual Aids and Descriptions

Source: forbes.com
Understanding the visual aspects of a properly installed asphalt shingle roof is crucial for ensuring a long-lasting, weatherproof, and aesthetically pleasing result. This section will provide detailed descriptions of key elements, helping you to identify both excellent workmanship and potential problems.
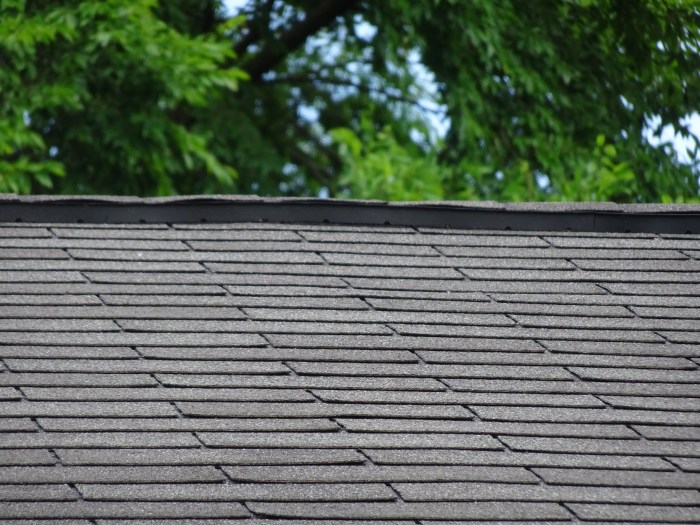
Correctly Installed Asphalt Shingles
A correctly installed asphalt shingle roof presents a uniform, neat appearance. Individual shingles should be aligned neatly, with consistent spacing and proper overlap. The bottom edge of each shingle should overlap the exposed portion of the shingle below it by a specific amount, usually indicated on the shingle packaging. This overlap creates multiple layers of protection against the elements. Looking at the roof from a distance, you should see straight, parallel lines formed by the shingle edges, with no significant gaps or misalignments. The overall texture should be even and consistent, with no noticeable bunching or waviness. Close inspection should reveal that the nails securing each shingle are properly driven, flush with the surface, and not protruding or bent.
Properly Installed Hip and Ridge Shingles
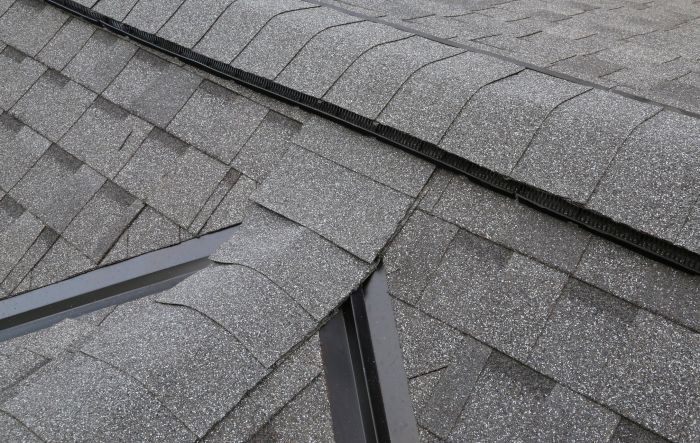
Hip and ridge shingles are specialized pieces designed to cover the angled intersections of roof slopes. A properly installed hip shingle will neatly cap the angled intersection, following the slope’s contour smoothly. The shingles are usually cut to fit and carefully layered to create a watertight seal. The edges should align precisely, and the entire hip area should look seamlessly integrated with the main roof surface. Similarly, ridge shingles, used to cover the peak of the roof, should lie flat and even, creating a clean, unbroken line along the ridge. These shingles often have a unique shape to help them interlock and shed water effectively. Improper installation might show gaps, unevenness, or shingle ends that stick out.
Flashing Around a Chimney
Proper flashing around a chimney is vital to prevent water from penetrating the roof at this vulnerable point. This involves installing a series of overlapping metal pieces that create a watertight barrier between the chimney and the roof. The process typically begins with installing base flashing, a continuous piece of metal that runs up the side of the chimney and under the shingles. This base flashing should extend several inches up the chimney and several inches onto the roof.
Proper overlap is crucial; each piece of flashing should overlap the one below it, ensuring that water cannot run behind the flashing.
Then, step flashing, individual pieces of metal, are installed, extending from the base flashing and tucked under each course of shingles. Each step flashing piece should overlap the one below it, and the top piece should be covered by the shingles. Finally, counter flashing is installed on top of the chimney, overlapping the step flashing and creating a final barrier against water intrusion.
Using high-quality, corrosion-resistant materials is paramount for long-term performance.
The entire flashing system should be completely sealed, with no gaps or openings. Any exposed nails should be sealed with roofing cement. Incorrect flashing can lead to significant water damage, so meticulous attention to detail is required.
Outcome Summary
Successfully laying asphalt shingles is a rewarding experience, transforming your home’s exterior and adding significant value. By following the steps outlined in this guide, paying close attention to detail, and prioritizing safety, you can achieve a professional-looking, durable roof that protects your home for years to come. Remember to always consult local building codes and consider professional help if you encounter any significant challenges beyond your skill level. Now go get that roof done!